
Sealing your RV roof with tape can save you time, money, and frustration—if you do it right. Done wrong, though, you’ll be right back on the ladder, peeling off failed patches and chasing leaks. To help you avoid costly do-overs, here are the most common mistakes RV owners make when applying roof seal tape, and how to sidestep them.

1. Skipping Surface Prep
Seal tape sticks best to clean, dry, and smooth surfaces. Dirt, grease, mildew, or lingering moisture acts like a barrier between the adhesive and your roof. The result? Poor adhesion that lifts, bubbles, or lets water sneak underneath.
Fix it:
-
Scrub the area with mild soap or a roof-safe cleaner.
-
Let the surface dry completely before taping.
-
Wipe down with isopropyl alcohol for a final clean.
Think of it as painting: prep work takes longer than the actual job, but it makes the job last.
2. Applying in Extreme Temperatures
Adhesives don’t love extremes. Apply tape when it’s too cold, and it won’t bond properly. Apply it in blazing heat, and the tape can stretch, wrinkle, or stick before you’ve positioned it.
Fix it:
-
Aim for a moderate range: ideally between 50°F and 90°F (10°C to 32°C).
-
If it’s cold, warm the tape indoors before use.
-
If it’s hot, work in the early morning or late evening, when surfaces are cooler.
Patience pays off here—rushing in bad conditions often leads to peeling later.
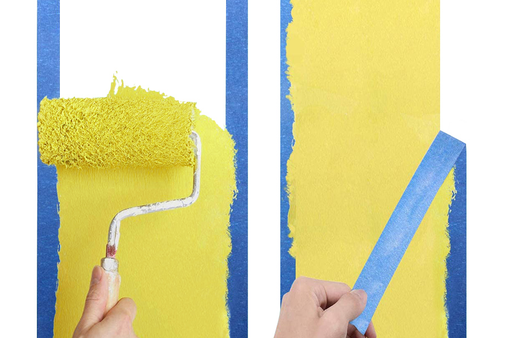
3. Overlapping Seams Improperly
One common rookie mistake is laying seams haphazardly. Misaligned overlaps can create channels where water seeps in instead of sealing out.
Fix it:
-
Always overlap by at least an inch, pressing firmly to eliminate gaps.
-
Use a roller to smooth the overlap and ensure solid contact.
-
Work methodically, section by section, rather than trying to cover too much at once.
Water loves to find the tiniest weakness—don’t give it a shortcut.
4. Ignoring Curing and Drying Times
Even quick-stick tapes need time to settle. Exposing fresh tape to rain or washing your RV too soon can compromise the bond.
Fix it:
-
Read the manufacturer’s recommendations for curing or settling time.
-
Avoid exposing the roof to rain, snow, or heavy dew until the tape has had time to adhere fully.
-
When in doubt, give it at least 24 hours of dry conditions.
Think of it as letting glue set—disturb it too early, and you’ll weaken the joint.
Why Choose XFasten RV Roof Seal Tape

When you’re trying to seal your RV roof properly, not all tapes are created equal. Here are what make XFasten RV Roof Seal Tape a strong option—and how choosing it helps you avoid the mistakes above:
1. Wide Temperature Range & Weather Resistance
-
XFasten’s butyl sealant is “tempered” to withstand extremes—from freezing (around −60°F) to intense heat (up to 230°F) without cracking or losing adhesion.
-
It resists UV, rain, corrosive chemicals, and mold—all of which degrade many tapes.
-
This durability helps you avoid mistakes like applying tape in extreme temperatures or having it peel when the weather shifts drastically.
2. Mess-Free butyl adhesive & Versatile Surfaces
-
The adhesive is self-priming butyl, which helps reduce the amount of extra prep required. While you still need to clean dirt, grime, or mold, you don’t always need special primers.
-
The tape works on many typical RV materials: rubber roofing, galvanized metal, fiberglass, plastic, aluminum, etc.
-
It flexes — can adjust to curves, seams, and different roof features without losing seal integrity.
This helps reduce mistakes around poor adhesion, badly prepared overlaps, and edges lifting up, because the tape can adapt to various surfaces and stress conditions.
3. Long-Term & Permanent Repairs
-
Because of its temperature and chemical resistance, many users report that XFasten’s tape makes repairs that last for years. It’s designed to resist physical and chemical degradation.
-
That means you’re less likely to need frequent re-sealing or face failures due to rain before the tape has cured.
4. Professional Finish & Ease of Use
-
The tape is designed for a clean, seamless, mess-free finish. That means less fuss, fewer tools, and a reduced risk of wrinkles or bubbles if applied correctly.
-
It comes in various widths (2", 4", 6") by long lengths (often 50 ft), giving flexibility for different leak sizes and job scales.
5. Cost-Effectiveness & Reduced Risk
-
Because it lasts longer and holds up better in tough conditions, over time, XFasten can save you money (less rework, fewer seal failures) and reduce the risk of interior damage from leaks.
-
Also, easier installation reduces labor/time costs—if you avoid mistakes like those in surface prep or curing time, you spend less on patch-ups.
Final Thoughts
Roof seal tape is one of the most effective DIY tools for keeping your RV watertight, but it isn’t foolproof. The difference between a quick fix and a long-lasting repair often comes down to avoiding these simple mistakes. Prep carefully, pick the right day, overlap with care, and respect curing time. Your future self—dry, comfortable, and leak-free—will thank you.
Become an XFasten Affiliate
Join our affiliate program and start earning with XFasten! Promote products you love and earn commissions on every sale. Click below to learn how to get started!
Learn More
Comments
2 Comments
<p>98 Best Marketplaces To Buy Verified Cash App Accounts in Google<br> Make your financial dealings simpler and more reliable. Take comfort in the knowledge that your transactions are secure.. Take control of your finances now. Convenience and security are provided by Cash App accounts.</p> <p>✅✅✅Our Account Details-</p> <p>✅Email verified<br> ✅USA Number verified<br> ✅Selfie verified<br> ✅SSN number verified<br> ✅Bank details verified (for BTC-enabled)<br> ✅Have higher transaction limits<br> ✅Superfast delivery confirmed<br> ✅100% customer satisfaction guaranteed</p> <p>✅Please contact us first. And if you have any questions ask us we will try to answer your questions.</p> <p>▰▰▰▰▰▰▰▰▰▰▰▰<br> ⭐⭐⭐⭐⭐⭐⭐⭐⭐⭐⭐⭐⭐⭐⭐⭐⭐⭐⭐⭐⭐⭐⭐⭐⭐⭐⭐⭐⭐⭐⭐⭐⭐⭐⭐⭐⭐⭐⭐⭐⭐⭐⭐⭐</p> <p>https://verifybuysmm.com/product/buy-verified-cash-app-accounts/</p> <p>✅⇒So order verified Facebook accounts from verifiybuysmm.com</p> <p>✅⇒If you want more information just contact me now.</p> <p>✅⇒ 📞 WhatsApp: +1 (929) 802-2279</p> <p>✅⇒✈️ Telegram: verifybuysmm</p> <p>✅⇒Website Visit Now 🌍https://verifybuysmm.com/product/buy-verified-cash-app-accounts/</p> <p>https://verifybuysmm.com/product/buy-verified-cash-app-accounts/</p> <p>⭐⭐⭐⭐⭐⭐⭐⭐⭐⭐⭐⭐⭐⭐⭐⭐⭐⭐⭐⭐⭐⭐⭐⭐⭐⭐⭐⭐⭐⭐⭐⭐⭐⭐⭐⭐⭐⭐⭐⭐⭐⭐⭐⭐</p> <p>▰▰▰▰▰▰▰▰▰▰▰▰</p> <p>Buy Verified Cash App Accounts<br> In today’s digital age, Cash App has become a popular way to handle money. For many, it offers a fast, easy way to send and receive funds.</p> <p>Purchasing validated Cash App accounts has a number of advantages.. A verified account ensures smooth transactions and increased security. This is especially important for businesses or individuals dealing with frequent transfers. But why consider buying a verified account instead of creating one?</p> <p>The process of verifying an account can be time-consuming and complex. Buying one simplifies this process, saving you time and effort. In this post, we will explore the advantages of buying verified Cash App accounts and how to ensure you make a safe purchase. Stay with us to learn more about this convenient solution for your financial needs.</p> <p>Introduction To Verified Cash App Accounts<br> The Cash App is now a widely used method of sending and receiving money.. To use it safely, verification is important. Verified Cash App accounts offer many benefits. They make transactions smoother and more secure. But what exactly does it mean to have a verified account? Let’s dive into this topic.</p> <p>Importance Of Verification<br> Verification adds a layer of trust to your Cash App account. It demonstrates to others your genuineness as a person. This is crucial in today’s digital world. Many people use Cash App for personal and business reasons. A verified account makes these transactions safer.</p> <p>Without verification, your account has limits. You can only send and receive small amounts. This can be a hassle. Verification removes these limits. It allows you to handle more money. This is especially useful for businesses. They often deal with larger transactions. Verified accounts make this possible.</p> <p>Impact On Security<br> Security is a top concern for everyone. Verified Cash App accounts offer better security. They require identification. This makes it harder for fraudsters to use your account. Your money and personal information stay safe.</p> <p>Unverified accounts are more vulnerable. They can be targets for scams. Verification reduces this risk. It adds extra steps for anyone trying to access your account. These steps protect you. They make sure that only you can use your account.</p> <p>In summary, verification is not just a formality. It is a necessary step for better security and larger transactions.</p> <p>Benefits Of Verified Accounts<br> Buying verified Cash App accounts offers many advantages. They make transactions safer and more efficient. Below, we explore two main benefits of verified accounts.</p> <p>Enhanced Security<br> Verified accounts come with enhanced security features. These features protect your money and personal information. They help prevent unauthorized access and fraudulent activities. Additionally, verified accounts often have two-factor authentication. This adds an extra layer of protection. With these security measures, you can have peace of mind while using Cash App.</p> <p>Increased Transaction Limits<br> Verified accounts also offer increased transaction limits. You can send and receive more money as a result.. Unverified accounts have lower limits. They can be restrictive for users with high transaction needs. Verified accounts allow for larger transfers and deposits. This makes them ideal for business transactions or large personal transfers.</p> <p>Overall, verified Cash App accounts provide significant benefits. They enhance security and increase transaction limits. This makes them a valuable asset for users who want to maximize their Cash App experience.</p> <p>How To Verify Your Cash App Account<br> Verifying your Cash App account is essential for unlocking its full potential. A verified account allows you to access higher transaction limits and additional features. Follow this guide to ensure your account is verified smoothly and efficiently.</p> <p>Cash App account is a straightforward process. Here is a detailed guide to assist you:</p> <p>Ensure your documents are clear and legible to avoid any delays in the verification process. By following these steps and providing the necessary documents, you can quickly verify your Cash App account and enjoy its full benefits.</p> <p>Risks Of Unverified Accounts<br> Using unverified Cash App accounts can lead to several risks. These risks can impact your financial security and your ability to use the service effectively. Below, we will explore some of the main dangers linked to unverified accounts.</p> <p>Fraud And Scams<br> Unverified accounts are a target for. often use unverified accounts to trick users into sending money. This can result in significant financial losses.</p> <p>Being vigilant and using verified accounts can help you avoid these scams.</p> <p>Transaction Restrictions<br> Unverified accounts face transaction restrictions. These restrictions limit how much money you can send or receive. It can also affect your ability to link bank accounts or credit cards.</p> <p>Verification helps you enjoy higher limits and fewer restrictions.</p> <p>Where To Buy Verified Cash App Accounts<br> Looking to buy verified Cash App accounts? You need to know where to find reliable sources. Buying from the right place ensures you get a legit account. In this section, we’ll explore trusted platforms and red flags to watch for.</p> <p>Trusted Platforms<br> When searching for verified Cash App accounts, it’s important to use trusted platforms. Here are some platforms to consider:</p> <p>Red Flags To Watch<br> Be cautious when buying verified Cash App accounts. Red flags to look out for include the following:</p> <p>By following these tips, you can find a reliable source for verified Cash App accounts. Stay safe and make informed decisions.</p> <p>Cost Of Verified Accounts<br> Purchasing validated Cash App accounts can cut down on hassle and save time.. These accounts often come with extra security features.</p> <p>Purchasing validated Cash App accounts has several advantages.. Yet, understanding the cost is crucial before making a purchase. Prices can vary, influenced by several factors. Below, we break down the price range and factors affecting the cost of verified accounts.</p> <p>Price Range<br> The cost of verified Cash App accounts ranges from $50 to $150. Some sellers might offer discounts for bulk purchases. Always consider the value and security before choosing a seller. Lower prices might seem attractive but can come with risks.</p> <p>Factors Affecting Cost<br> Several factors influence the cost of verified Cash App accounts. 1. Account Age: Older accounts often cost more. They appear more authentic. 2. Verification Level: Accounts with higher verification levels are priced higher. They offer more security. 3. Usage History: Accounts with a transaction history cost more. They seem more legitimate. 4. Seller Reputation: Trusted sellers charge more. They provide better assurance of account quality. 5. Additional Features: Some accounts come with linked bank accounts. These features can increase the price. You can make a better decision if you are aware of these factors. Always prioritize account security and seller reliability over lower prices.</p> <p>Buy Verified Cash App Accounts</p> <p>Legal Implications Of Buying Accounts<br> It might seem like a quick fix to purchase Cash App account accounts.. However, it comes with various legal concerns. Understanding these implications is vital before making such a purchase.</p> <p>Terms Of Service<br> First, the Cash App Terms of Service explicitly prohibit selling or buying accounts. Engaging in this activity violates their rules. They can terminate or suspend your account if detected. This means you could lose access to your funds.</p> <p>Additionally, buying an account often involves sharing personal information. This could lead to identity theft. Always consider the risks involved in sharing your personal data.</p> <p>Understanding these implications helps you make informed decisions. Always prioritize your security and comply with terms of service to avoid these risks.</p> <p>User Reviews And Testimonials<br> Understanding the true value of verified Cash App accounts can be best achieved through user reviews and testimonials. These insights provide a real-world perspective on the benefits and drawbacks users experience. Below, we share some positive experiences and common complaints from verified Cash App account users.</p> <p>Positive Experiences<br> Many users report increased security and ease of transactions with verified Cash App accounts. Here’s what some had to say:</p> <p>In addition, users appreciate the customer support they receive once their accounts are verified. Many have highlighted the prompt responses and effective solutions provided by the support team.</p> <p>Common Complaints<br> Despite the benefits, some users have shared common complaints about verified Cash App accounts. These include:</p> <p>These complaints are often related to the initial setup and verification process. Users have mentioned that these issues are usually resolved with time and patience.</p> <p>Overall, user reviews and testimonials provide valuable insights into the real-world experiences of verified Cash App account holders. They highlight both the benefits and challenges, helping potential users make informed decisions.</p> <p>Comparing Verified Vs. Unverified Accounts<br> Comparing verified and unverified Cash App accounts is important. It helps users make informed choices. Verified accounts offer more security and better features. Unverified accounts come with limitations. Let’s break down the differences.</p> <p>Security Features<br> Verified accounts come with enhanced security features. These include two-factor authentication and account alerts. Users can feel safe knowing their money is protected. Verified accounts also have fraud detection systems. They monitor suspicious activities.</p> <p>Unverified accounts lack these advanced security features. They are more vulnerable to scams and hacks. Users might face higher risks. Protecting personal and financial information becomes challenging.</p> <p>User Experience<br> With verified accounts, users enjoy a smoother experience. They have access to higher transaction limits. More money can be sent and received by verified accounts.. This makes managing finances easier.</p> <p>Unverified accounts face many restrictions. Users have lower transaction limits. They cannot access certain features. This hampers the overall user experience. Unverified accounts might also face delays in transactions.</p> <p>Choosing a verified account can greatly improve your Cash App experience. It offers better security and more features. This makes managing your money easier and safer.</p> <p>Common Scams And How To Avoid Them<br> Buying verified Cash App accounts can be risky. Scammers target people who seek these accounts. Knowing the common scams helps protect your money and personal information. Here, we discuss how to identify scams and keep your account safe.</p> <p>Identifying Scams<br> Scammers often pose as legitimate sellers. Deals they offer might look too good to be true. Always be cautious of such offers. Check for reviews or endorsements from previous customers.. If there are no reviews, it’s a red flag.</p> <p>Another scam involves phishing emails. Scammers send emails pretending to be from Cash App. These emails ask for your login details. Never provide your information via email. Your PIN or password will never be requested by Cash App.</p> <p>Some scammers use fake websites. These sites look like the real Cash App site. Prior to entering your information, always verify the URL.. The official site will have a secure HTTPS connection. In the address bar, look for the padlock icon.</p> <p>Protecting Your Account<br> Protecting your account is crucial. Use a strong password that is hard to guess. Change your password regularly. Enable two-factor authentication for added security.</p> <p>Be cautious of unsolicited messages. Scammers may contact you through social media or text. Always verify the identity of the sender before sharing any information.</p> <p>Regularly monitor your account for any suspicious activity. Report any unauthorized transactions to Cash App immediately. Quick action can prevent further loss.</p> <p>Educate yourself about the latest scams. Stay informed to keep your account safe. Knowledge is your best defense against scammers.</p> <p>Steps After Purchasing A Verified Account<br> Purchasing a verified Cash App account is a great step towards seamless transactions. But what comes next? Here are the steps you should follow after getting your new account.</p> <p>Account Setup<br> Begin by logging into your new account. Double-check all the details. Ensure the account is in your name. Update your profile information if needed.</p> <p>Next, link your bank account. This will help in easy money transfers. Navigate to the settings, and follow the prompts to add your bank details.</p> <p>Verify your linked bank account. Usually, Cash App sends a small deposit for verification. Confirm this deposit in the app.</p> <p>Security Tips<br> Enable two-factor authentication. This adds an extra layer of security. Go to the security settings and turn it on.</p> <p>Create a strong password. Utilize a combination of symbols, numbers, and letters.. Avoid using common words or easy-to-guess phrases.</p> <p>Monitor your account regularly. Check for any suspicious activity. Report any unauthorized transactions immediately.</p> <p>Update your app regularly. New updates often include security patches. Ensure you have the latest version installed.</p> <p>Avoid sharing your login details. Keep your account information private. Be cautious of phishing scams.</p> <p>Following these steps will help you use your Cash App account securely and efficiently.</p> <p>Buy Verified Cash App Accounts</p> <p>Alternatives To Buying Verified Accounts<br> It may seem like a quick fix to purchase verified Cash App accounts. However, there are more dependable and safe substitutes. These options ensure your financial transactions remain secure without the risks involved in purchasing accounts.</p> <p>Self-verification<br> Self-verification is a straightforward process. It involves providing your information directly to Cash App. This comprises the last four digits of your Social Security number, your full name, and your birthdate.. Once verified, you can enjoy all the features of a verified account. It is a safer and more ethical way to access these benefits.</p> <p>Verification ensures your account is secure. It also helps in recovering your account if you lose access. You don’t need to worry about someone else having access to your information. This approach is dependable and provides you with comfort.</p> <p>Other Payment Apps<br> Several other payment apps offer similar features to Cash App. Consider using PayPal, Venmo, or Zelle. These apps are widely used and trusted. They offer secure payment options and easy account verification.</p> <p>Each app has its own set of features. Examine them to determine which one best meets your requirements. These alternatives provide the same level of convenience and security. You don’t need to buy a verified account. Simply follow their verification processes.</p> <p>Using these apps can diversify your payment options. It can also protect you from putting all your financial activities on one platform. This way, you can manage your money more effectively and securely.</p> <p>Customer Support For Verified Accounts<br> Customer support for verified Cash App account ensures users get help when needed. Verified accounts often come with extra benefits and better support options. This section explores the available contact methods and response times for verified users.</p> <p>Contact Methods<br> Verified users can contact Cash App support through various methods. The app itself offers an in-app messaging feature. This is the easiest way to get help. Users can also reach out via email for more detailed issues. Phone support is available for urgent matters. Each method is designed to provide quick and effective assistance.</p> <p>Response Times<br> Response times for verified accounts are usually faster. In-app messages typically receive replies within a few hours. Responses to emails could take up to a day.. Phone support offers immediate help. Quick response times ensure that users’ issues are resolved promptly. This improves the overall user experience.</p> <p>Tips For Safe Transactions<br> Ensuring safe transactions while using Cash App accounts is crucial. With the rise of online fraud, taking precautions can protect your money and data. Here are some valuable tips for safe transactions.</p> <p>Using Verified Accounts<br> Always use verified Cash App accounts. Verified accounts offer added security features. They help prevent unauthorized access. Ensure the account has a verified badge. This confirms its authenticity. Verified accounts reduce the risk of fraud. They also enhance your trust in transactions.</p> <p>Avoiding Fraud<br> Stay alert to potential scams. Never share your personal information. Avoid clicking on suspicious links. Be cautious with unknown contacts. Make sure the person you are interacting with is who they say they are.. Use the app’s security settings. Enable notifications for transactions. This keeps you informed about account activity.</p> <p>Buy Verified Cash App Accounts</p> <p>Understanding Cash App Features<br> Cash App is a popular mobile payment service. Users can send and receive money using it. To fully benefit from Cash App, it is essential to understand its features. This section will cover two main features: sending money and receiving money.</p> <p>Receiving Money<br> Receiving money on Cash App is as simple as sending it. Follow these steps:</p> <p>Always verify the sender’s details before accepting funds. This ensures the money is from a trusted source.</p> <p>With these simple steps, you can easily send and receive money using Cash App. Understanding these features can make your transactions smoother and more secure.</p> <p>Importance Of Regular Account Monitoring<br> Purchasing validated Cash App accounts has several advantages.. Yet, without regular account monitoring, risks can arise. Monitoring helps in detecting fraud and maintaining security. It’s crucial to check your accounts frequently. This ensures they remain secure and trustworthy.</p> <p>Detecting Fraud<br> Regular monitoring helps in detecting fraud early. Scammers often look for vulnerabilities. By checking your account often, you can spot unusual activities quickly. This allows you to take action before significant damage occurs.</p> <p>Keep an eye on these signs. Regular checks can save you from potential losses.</p> <p>Maintaining Security<br> Maintaining security is vital for Buy Verified Cash App Accounts. Hackers are always on the prowl. Regular monitoring ensures your account stays safe. Change your passwords often. Use two-factor authentication. These steps add layers of security.</p> <p>Following this checklist helps in maintaining a secure account. Consistent monitoring ensures you catch any breaches early.</p> <p>User Experiences With Verified Accounts</p> <p>Many users find that verified Cash App accounts provide a seamless experience. Verified accounts offer more security and additional features. These features make daily transactions easier and safer.</p> <p>Case Studies<br> Several users have shared their experiences with verified Cash App accounts. Let’s look at a few case studies.</p> <p>Success Stories<br> Purchasing verified Cash App accounts has resulted in many users reporting positive experiences.. Here are some success stories.</p> <p>Sarah: Sarah needed to send money internationally. Her verified account made it possible. She had no delays or issues.</p> <p>Tom: Tom’s Buy Verified Cash App Accounts allowed him to receive large payments. He used it for his freelance work. No more payment hassles.</p> <p>Emily: Emily wanted added security for her transactions. Her verified account provided that. She feels safer now.</p> <p>These stories show the benefits of verified Cash App accounts. Users experience enhanced security and convenience. This leads to better financial management.</p> <p>Future Of Cash App Verification<br> The future of Cash App verification looks promising. With technology evolving, the process is becoming smoother. Users demand secure and efficient transactions.</p> <p>Cash App is adapting to meet these needs. Let’s explore what’s next.</p> <p>Upcoming Features<br> Buy Verified Cash App Accounts plans to introduce advanced features. These features will enhance user verification. Facial recognition is one such feature. It offers a higher level of security.</p> <p>Another feature is two-factor authentication. This adds an extra layer of protection. Users will feel more secure with these updates.</p> <p>Industry Trends<br> The industry is moving towards seamless verification. Instant verification is becoming a trend. Users do not want to wait long.</p> <p>Blockchain technology is also influencing the industry. It ensures transparency and security. Many apps are adopting this technology.</p> <p>Another trend is biometric verification. Fingerprint and facial scans are becoming common. These methods are quick and reliable.</p> <p>Conclusion: Secure Your Transactions<br> Using Buy Verified Cash App Accounts can help secure your transactions. Security is vital in today’s digital age. It ensures your money and data stay safe. Verified accounts provide this assurance. They offer an extra layer of protection. This helps keep your financial information secure.</p> <p>Final Thoughts<br> Verified Cash App accounts are a wise choice. They offer peace of mind. You can rely on the security of your transactions. They reduce the risk of fraud. They also help protect your personal information.</p> <p>Choosing verified accounts ensures safety. It shows you value security. It also demonstrates that you care about your financial well-being. Safe transactions should always be a priority.</p> <p>Next Steps<br> Consider getting a verified Cash App account. Look for trusted sellers. Research their reputation. Ensure they offer genuine verified accounts. This will help you avoid scams.</p> <p>Once you have a verified account, use it wisely. Monitor your transactions regularly. Stay vigilant about your account activity. Take necessary steps to keep your account secure.</p> <p>Securing your transactions is vital. A verified Cash App account can help. Make the smart choice today. Protect your money and data. Enjoy peace of mind with every transaction.</p> <p>What Is A Verified Cash App Account?<br> A verified Cash App account has been confirmed with an ID for security.</p> <p>Why Buy A Verified Cash App Account?<br> It offers higher transaction limits and extra security features.</p> <p>Is Purchasing Verified Cash App Accounts Safe?<br> It depends on the source. Only Buy Verified Cash App Accounts from trusted sellers.</p> <p>How Much Do Verified Cash App Accounts Cost?<br> Prices vary. They can range from $50 to $200.</p> <p>Can I Get Started Using My Purchased Cash App Account Right Away?<br> Yes, once you buy it, you can use it right away.</p> <p>Are There Risks In Buying Cash App Accounts?<br> Yes, there’s a risk of scams and account suspension.</p> <p>How Do I Verify My Own Cash App Account?<br> Submit your ID and personal information in the app settings.</p> <p>What Features Come With A Verified Account?<br> Higher sending limits, direct deposits, and better security features.</p> <p>Can A Verified Cash App Account Be Hacked?<br> Any account can be hacked, but verified accounts have better security.</p> <p>What Should I Check Before Buying?<br> Ensure the seller is reputable and provides account details.</p> <p>Conclusion<br> Buying verified Cash App accounts is a smart choice for secure transactions. It ensures your money remains safe and accessible. With a verified account, you enjoy quick, hassle-free transfers. No more waiting or worrying. Invest now by creating a verified Cash App account.</p> <p>Make your financial dealings simpler and more reliable. Take comfort in the knowledge that your transactions are secure.. Take control of your finances now. Convenience and security are provided by verified Cash App accounts.. Don’t miss out on these benefits. Make the switch today and experience smoother transactions.</p>
<p>I was recently scammed out of $53,000 by a fraudulent Bitcoin investment scheme, which added significant stress to my already difficult health issues, as I was also facing cancer surgery expenses. Desperate to recover my funds, I spent hours researching and consulting other victims, which led me to discover the excellent reputation of Capital Crypto Recover, I came across a Google post It was only after spending many hours researching and asking other victims for advice that I discovered Capital Crypto Recovery’s stellar reputation. I decided to contact them because of their successful recovery record and encouraging client testimonials. I had no idea that this would be the pivotal moment in my fight against cryptocurrency theft. Thanks to their expert team, I was able to recover my lost cryptocurrency back. The process was intricate, but Capital Crypto Recovery’s commitment to utilizing the latest technology ensured a successful outcome. I highly recommend their services to anyone who has fallen victim to cryptocurrency fraud. For assistance contact Recoverycapital@fastservice.com and on Telegram OR Call Number +1 (336)390-6684 via email: Capitalcryptorecover@zohomail.com you can visit his website: https://recovercapital.wixsite.com/capital-crypto-rec-1</p>